Important: the article below is regarding the "classic" (legacy) Magpi app, not the currently available Magpi Plus mobile app (which is the same for iOS and Android). We've left the article in place for those users still using the legacy app, but we strongly recommend using the Magpi Plus app.
Magpi Android App User Guide

This guide will show you how to use the Magpi Android App to deploy and fill out
electronic forms created with the Magpi online form designer
Installing Magpi for Android
Glossary of Useful Terms
Logging in to Android Magpi
The Magpi Home Screen
Downloading Forms from the Web
The Form Menu
Collecting Data with Magpi
Answering a Question
Swiping Left and Right
Required Questions
Reaching the End of a Form
The Up Button
Exiting a Form Before Finishing
Subforms
Submitting Records to the Magpi.com Server
Reviewing Records Saved In the Mobile Device
Editing Saved Records
Deleting Saved Records
Settings
Logging Out from Magpi
Uninstalling Magpi from the Android Mobile Device
Supported Devices
Additional Languages
Hierarchy of the Magpi App
Support
Installing Magpi for Android
There are two ways to install Magpi onto your Android device:
install from the Google Play store
install from an apk file (an Android installation file)
We very strongly recommend method #1, because this is the only way that you will receive automatic updates and bug fixes.
If you download and install an apk manually, you won’t know about new versions and may run into problems in your version that have already been fixed in the latest version (Magpi is always being improved, with new features added and bugs being fixed).
Here is the link for Magpi on the Google Play store:
https://play.google.com/store/apps/details?id=org.magpi.android&hl=en
And here is the link for the latest apk:
http://bitly.com/magpi-android-latest
With the apk file you can download it directly in your mobile device browser, or else download to your desktop or laptop and later transfer the file to your mobile device via bluetooth or on a memory card.

Whether you install via Google Play (recommended) or via the apk file directly, after installation you should see the Magpi app icon on your applications screen.
Glossary of Useful Terms
form - a “form” is a list of questions produced at the Magpi.com web application. Sometimes this is also called a questionnaire, or a survey.
record - a “record” is the complete set of data from one completed form. That is, a data record consists of all the answers to the questions in the form. When uploaded and viewed online at Magpi.com, a data record will comprise one row in the data file.
upload - an “upload” is the transmission of one data record to the Magpi.com web servers.
Logging in to Android Magpi
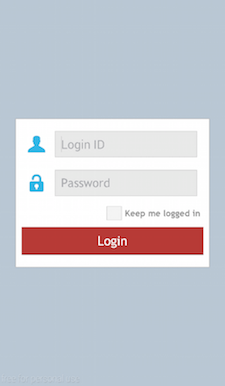
Tapping on the Magpi app icon will launch the application and bring you to the login screen (at right).
On the Magpi login screen you will need to enter your Magpi credentials, which are created when you register for Magpi at www.magpi.com.
If you have not yet registered with Magpi, you will need to first go to www.magpi.com and click the button marked “Sign Up for Free”. The registration process takes less than one minute.
After registering, you can log into the Magpi app using the same email address and password you used for registration.
Important: if you will be collecting data offline, make sure to choose the “Keep me logged in” option.
The Magpi Home Screen
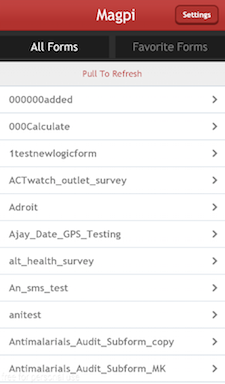
On the Magpi home screen (also called the “Form List”) you can see:
a list of “All Forms”: all the forms to which you have access: forms you have created and forms that others have shared with you
a button to view your “Favorite Forms”: forms that you have designated as favorites.
a button to view the app settings
a reminder to “pull to refresh”: if you put your finger down near the top of the form list and slide it downward and release, this signals the app to contact the Magpi server and see if there are any new or modified forms (obviously, this can only work if you have an internet connection).

Paid Magpi subscribers do not need to “pull to refresh”, as any new forms or changes to forms are automatically synchronized to their devices.
Downloading Forms from the Web
In older versions of Magpi, users had to manually download each form they wanted to use on a mobile device.
In the current version of Magpi, this is no longer necessary: when you log into the app it automatically downloads all forms available to the logged-in user.
The Form Menu

If you tap on any form in your form list, you will see the options available for that form. Options can include:
Add Record: begin entering data in a new, blank form
Review Data: look at previously entered data records
Upload Data: send previously entered data records to your account at Magpi.com
Export Data: send previously entered data records to a file on the device’s memory card
Favorite: make the selected form one of your favorites

In the image at right you can see the options available after tapping on form “1testnewlogicform”.
Not all options are available for every form. For example, if you have not yet collected any data with a form, the option to “Review Data”, or “Upload Data” or “Export Data”, will not be available (because there is no data to review or upload or export).
Collecting Data with Magpi
To begin filling in a Magpi form, just
tap the form name in the form list
select Add Record in the menu that pops up.

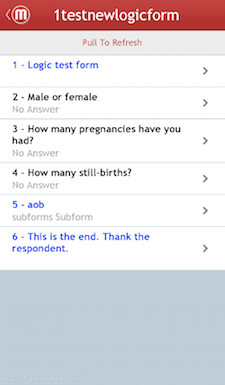
This will bring you to the Question List, a screen showing you all the questions in the form (at right).
To begin entering data, just tap on the question you want to answer..
Answering a Question
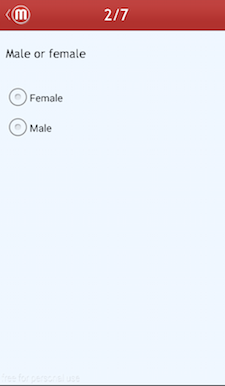
Tapping on question #2 in the question list shown above will open that question (“Male or female”) on the screen, as shown at right.
The user can tap the desired answer and then swipe to move to the next question.
Other types of questions will include a popup keyboard, to enter text or numbers, or a date picker.
Swiping Left and Right
Users familiar with touchscreen phones will understand the idea of “swiping” to move to the next or previous screen.
For example, to move to the next screen, the user would “swipe left” by placing a fingertip on the right side of the screen and moving it from the right to the left.
To move back (to the previous question), the user would “swipe right” by placing a fingertip on the left side of the screen and moving it from the left to the right.
Required Questions
Sometimes you can try to go to the next question without answering the question on the screen, and a message pops up saying “Sorry, this answer is required”. This is because the designer of the form can designate some or all questions as “required”: you will not be able to move forward to the next question without answering the current question.
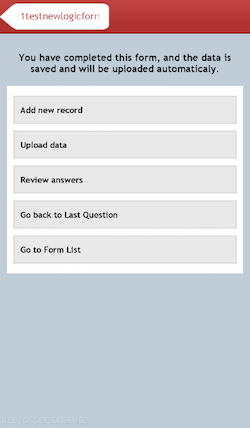
Reaching the End of a Form
When you are entering data into a form, and you swipe past the last question of that form, you will see the End-Form Menu, with five options (at right):
Add new record: this brings you to a new, blank copy of the same form
Upload data: this immediately tries to upload the just-entered data to the Magpi web servers
Review answers: this brings you to the question list, so that you can see all the answers you entered
Go back to Last Question
Go to Form List
The Up Button
In the upper-left corner of the screen you will see a Magpi logo with a caret next to it (a < character). On Android devices, this is called the “up button”. Tapping the up button will move you backwards through the app hierarchy (see “Hierarchy of the Magpi App”, below).
If you are viewing a single question, tapping the up button brings you back to the question list.
If you are viewing the question list, tapping the up button brings you back to the form list.
Exiting a Form Before Finishing
Sometimes you may want to exit a form before you have finished entering all the data (for example, by tapping the up button). In that case, you will see this dialog:
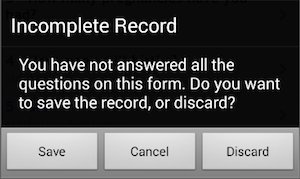
The dialog allows you to choose one of three options:
Save: this saves the partial record (so you can upload, review, or edit it later) and exits the form
Cancel: this puts you back into the form
Discard: this deletes the partial record and exits the form
Subforms
Magpi’s Android app now has the ability to display subforms for data collection. Subforms (sometimes called “rosters” or “child forms”) allow the user to embed one form within another.
A common example of when subforms can be used is when doing a household survey. It is common to ask a set of questions pertaining to the entire household (e.g. water source), and then to display (on paper) a table in which to list each member of the household (or each child, or each pregnant woman, etc).
Another user might be to collect information first about a facility (e.g. a pharmacy) and then use a subform to collect information about the stock levels for each stocked item.
On paper a household form might look like this:
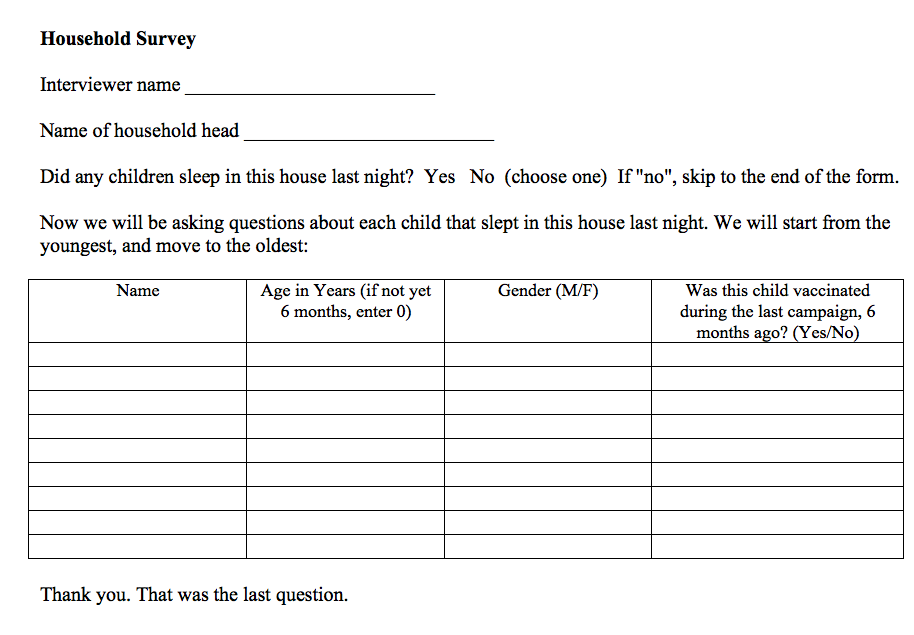
Such a form (really a combination of a household form and a child subform) on a mobile device would first display the initial household questions (interviewer name, household head, “did any children sleep in this household”) and would then allow the data collector to enter data for each child.
The data collector could repeat the child questions as many times as needed.
The image at right shows the view on a phone when the user has reached the beginning of a subform section.
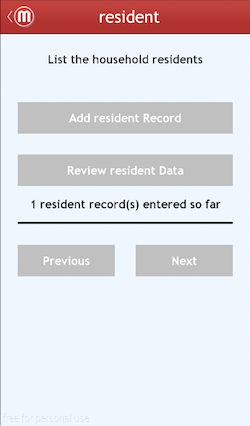
In the example at right, the subform is for residents of the household. You can see that the user has already answered the resident questions (e.g. name, age, gender, vaccination status) for 1 resident.
The buttons on the screen perform the following functions:
Add resident record - this goes to the first question of a new subform record (“name”)
Review resident data - this allows the user to review and edit previously-saved subform records
Previous - this jumps to the main form question immediately preceeding the subform
Next - this jumps to the main form question immediately after the subform. This would be used, for example, when the data collector had entered information for all the household residents and wished to proceed with the rest of the main household form.
Note that the word “resident” in the example above is specified by the form designer when creating the subform question. This can be seen below in a screenshot from the Magpi.com form designer showing the same question as displayed above:
By using the appropriate word, the form designer can create a natural-sounding subform screen.
Submitting Records to the Magpi.com Server
There are three ways that you can upload records to the server:
By selecting “Upload data automatically” in the Settings screen (See Magpi Settings, below) - this will make Magpi try periodically to upload any unsent data in the background.
By selecting “Upload data” after finishing a record (see Reaching the End of a Form, above).
By tapping a form in the form list, then selecting Upload Data from the form menu (see The Form Menu, above).
Reviewing Records Saved In the Mobile Device
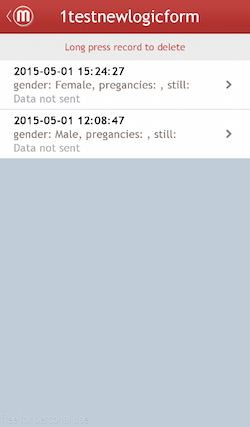
Once a record has been entered and saved to the device, it can be opened again later for viewing and editing. This might be necessary if you want to make a correction to a previously saved record.
To view the saved records, go to the Form List and tap on the form for which you would like to review data. Then, when the form menu pops up, choose Review Data. That will bring up a list of all the records for that form (at right).
Each entry in the record review list shows the date and time that the record was first saved, along with the answers to the first few questions.
Editing Saved Records
Tapping on any of the records will allow you to review or edit each question (just as if you were filling out the form for the first time).
Deleting Saved Records
Tapping and holding on any of the records (this is called a “long press”) will allow you to delete that record.
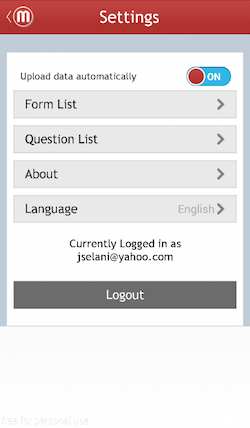
Settings
By tapping the Settings button from the Form List, you can access various settings for Magpi, including:
turning on automatic data upload
logging out of the app
changing the sort order of the form list
hiding or showing skip patterns
changing the app language
You can also view the version number for the app, which can be useful information for our support team if you run into a problem.
Logging Out from Magpi
You can log out from the Settings screen.
Uninstalling Magpi from the Android Mobile Device
To uninstall Magpi Mobile from your Android device, go to the Android Settings > Application > Manage Applications and select Magpi. Press or click the uninstall button, this will uninstall Magpi Mobile from the mobile device and also delete any saved forms.
Supported Devices
Magpi will run on any Android device running Android 2.2 or higher.
We recommend installing Magpi from the Google Play store: https://play.google.com/store/apps/details?id=org.magpi.android&hl=en
Additional Languages
Magpi Mobile is available in English, Spanish, French and Swahili. Additional language versions of our Android app can be produced on request (extra charges may apply).
Hierarchy of the Magpi App

Support
Free support is available to all Magpi users at support.magpi.com
At that site, users can:
read support articles
create support tickets (requests for assistance)
review the status of their tickets
Users can also create a support ticket by emailing support@magpi.com or by clicking the black Magpi Support tab located on the right at www.magpi.com after logging in.
[Please note that Magpi was previously referred to as EpiSurveyor. There may be cases that still refer to "EpiSurveyor". If you see one, please let us know so we can update it. Thanks!]
Click this http://bitly.com/magpi-android-guide to download this complete user guide doc.